Enabling GPU-native analytics with Xarray and kvikIO
Tuesday, August 30th, 2022 (over 1 year ago)
TLDR
We demonstrate registering an Xarray backend that reads data from a Zarr store directly to GPU memory as CuPy arrays using the new kvikIO library and GPU Direct Storage technology. This allows direct-to-GPU reads and GPU-native analytics on existing pipelines 🎉 😱 🤯 🥳.
Background
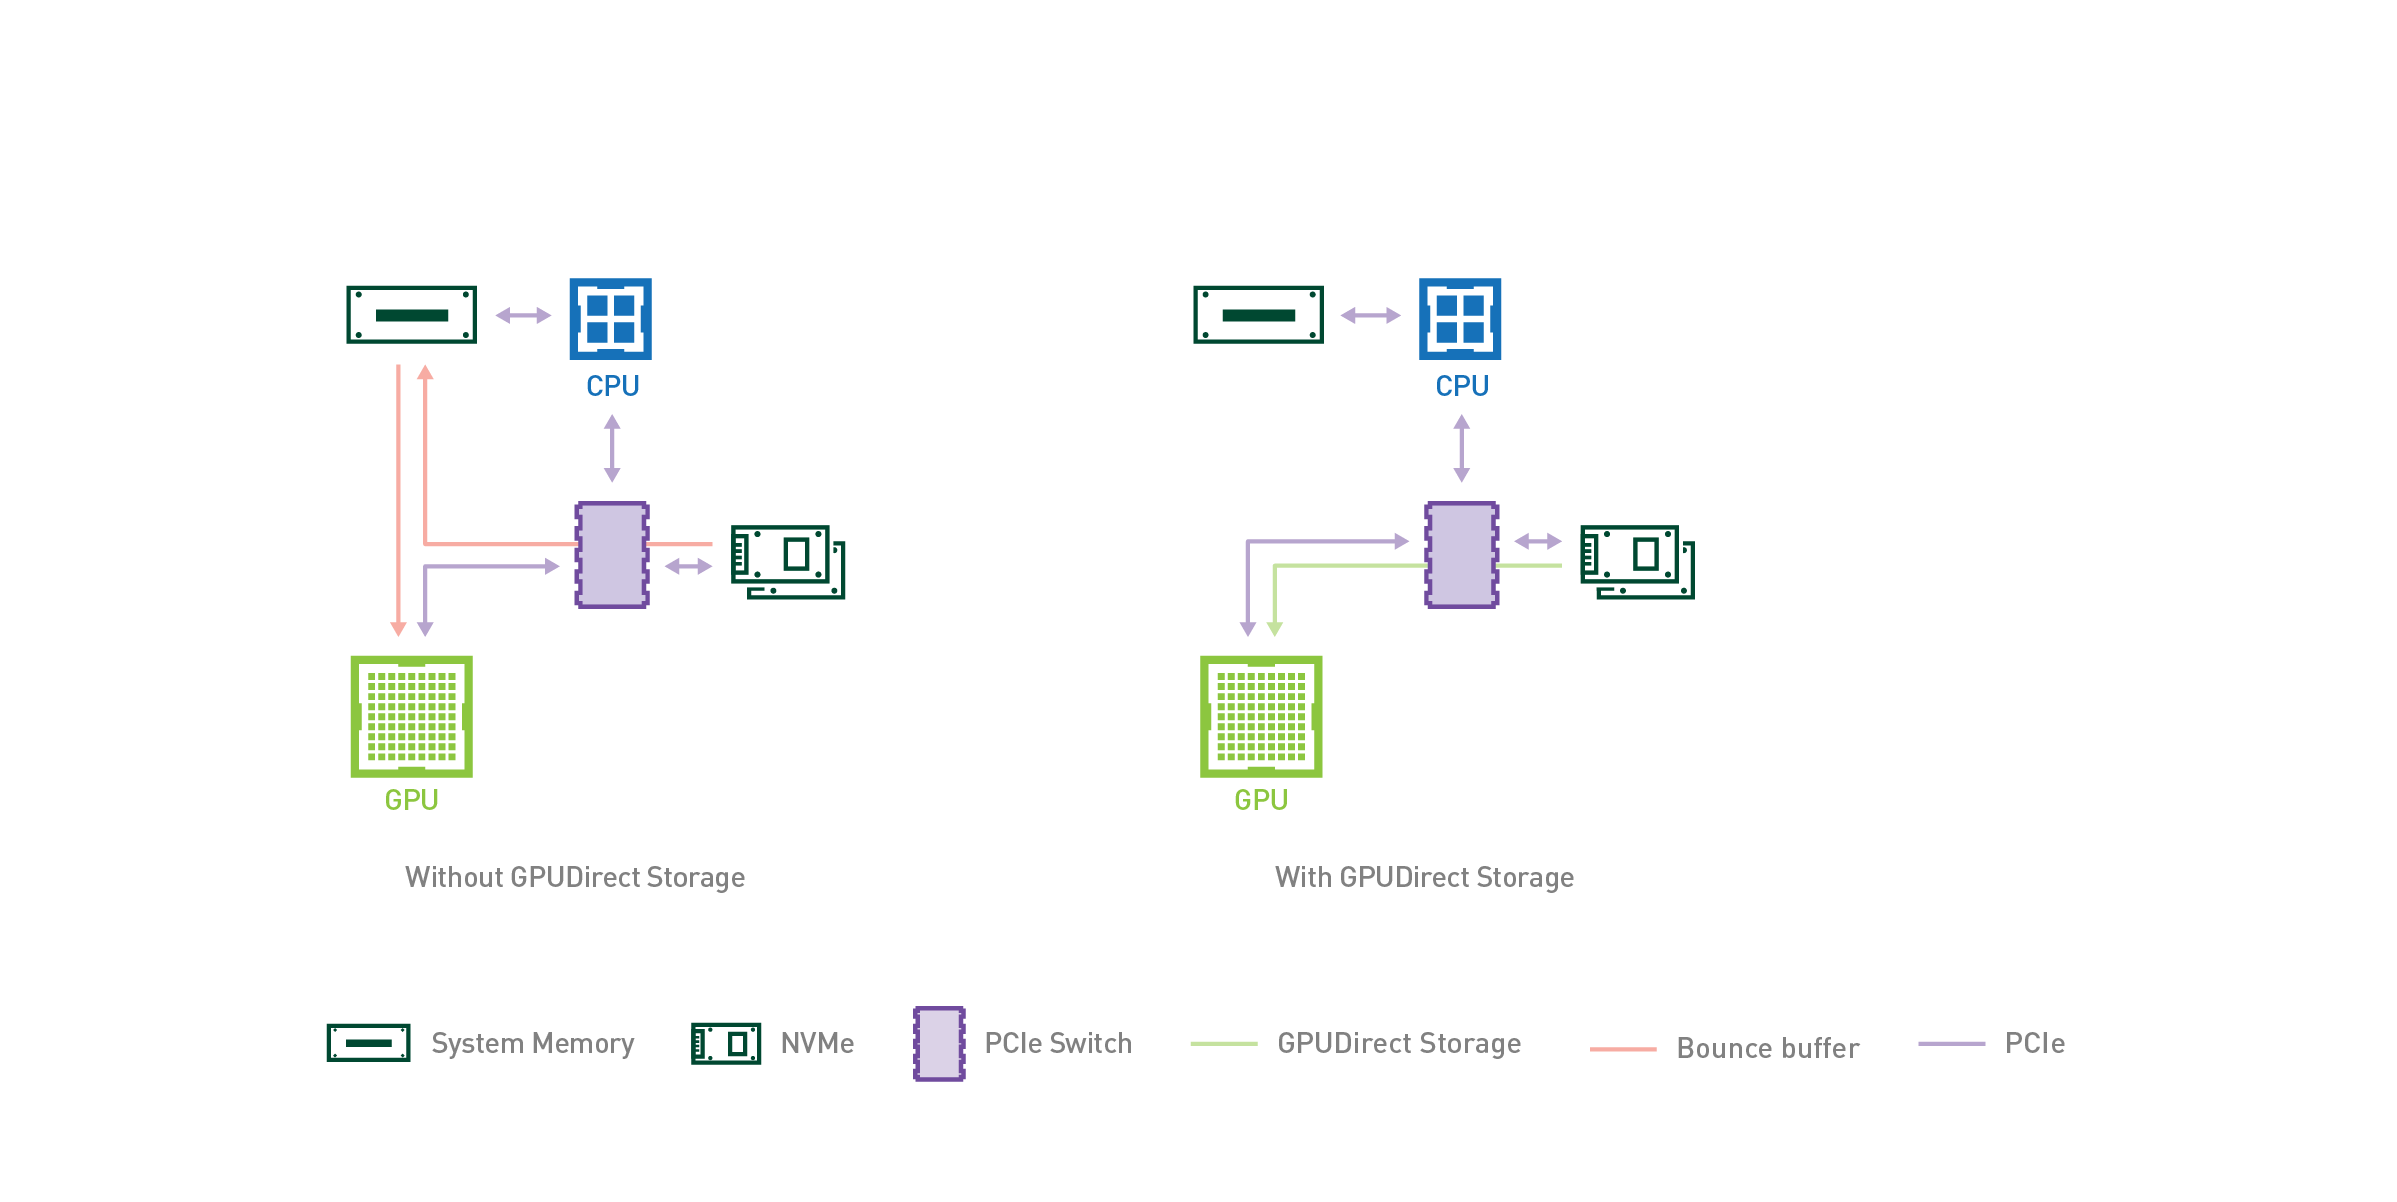
What is GPU Direct Storage?
Quoting this nVIDIA blogpost
I/O, the process of loading data from storage to GPUs for processing, has historically been controlled by the CPU. As computation shifts from slower CPUs to faster GPUs, I/O becomes more of a bottleneck to overall application performance. Just as GPUDirect RDMA (Remote Direct Memory Address) improved bandwidth and latency when moving data directly between a network interface card (NIC) and GPU memory, a new technology called GPUDirect Storage enables a direct data path between local or remote storage, like NVMe or NVMe over Fabric (NVMe-oF), and GPU memory. Both GPUDirect RDMA and GPUDirect Storage avoid extra copies through a bounce buffer in the CPU’s memory and enable a direct memory access (DMA) engine near the NIC or storage to move data on a direct path into or out of GPU memory, all without burdening the CPU or GPU. For GPUDirect Storage, storage location doesn’t matter; it could be inside an enclosure, within the rack, or connected over the network.
What is kvikIO?
kvikIO is a Python library providing bindings to cuFile, which enables GPUDirectStorage (GDS).
For Xarray, the key bit is that kvikIO exposes a a zarr store called GDSStore that does all the hard work for us. Since Xarray knows how to read Zarr stores, we can adapt it to create a new storage backend that uses kvikio. And thanks to recent work funded by the Chan Zuckerberg Initiative, creating and registering a new backend is quite easy!
Integrating with Xarray
Getting all these pieces to work together requires using three in-progress pull requests that
- Teach Zarr to handle alternative array classes
- Rewrite a small bit of Xarray to not cast all data to a numpy array after read from disk
- Make a backend that connects Xarray to kvikIO
Writing the backend for Xarray was relatively easy with most of the code copied over or inherited from the existing Zarr backend. We did have to ensure that dimension coordinates (for example, a time dimension with timestamps for a timeseries dataset) could be read in directly to host memory (RAM) without raising an error (by default kvikIO loads all data to device memory). This is required because Xarrays creates pandas.Index objects for such variables. In the future, we could consider using cudf.Index instead to allow a fully GPU-backed Xarray object.
Usage
Assuming you have all the pieces together (see Appendix I and Appendix II for step-by-step instructions), then using all this cool technology only requires adding engine="kvikio" to your open_dataset line (!)
import xarray as xr

ds = xr.open_dataset("file.zarr", engine="kvikio", consolidated=False)
Notice that importing cupy_xarray was not needed. cupy_xarray uses entrypoints to register the kvikIO backend with Xarray.
With this ds.load() will load directly to GPU memory and ds will now contain CuPy arrays. At present there are a few limitations:
- Zarr stores cannot be read with consolidated metadata, and
- compression is unsupported by the kvikIO backend.
Quick demo
First create an example uncompressed dataset to read from
import xarray as xr

store = "./air-temperature.zarr"

airt = xr.tutorial.open_dataset("air_temperature", engine="netcdf4")

for var in airt.variables:
    airt[var].encoding["compressor"] = None
airt.to_zarr(store, mode="w", consolidated=True)
Now read
# consolidated must be False
ds = xr.open_dataset(store, engine="kvikio", consolidated=False)
ds.air
<xarray.DataArray 'air' (time: 2920, lat: 25, lon: 53)>
[3869000 values with dtype=float32]
Coordinates:
  * lat      (lat) float32 75.0 72.5 70.0 67.5 65.0 ... 25.0 22.5 20.0 17.5 15.0
  * lon      (lon) float32 200.0 202.5 205.0 207.5 ... 322.5 325.0 327.5 330.0
  * time     (time) datetime64[ns] 2013-01-01 ... 2014-12-31T18:00:00
Attributes:
    GRIB_id:       11
    GRIB_name:     TMP
    actual_range:  [185.16000366210938, 322.1000061035156]
    dataset:       NMC Reanalysis
    level_desc:    Surface
    long_name:     4xDaily Air temperature at sigma level 995
    parent_stat:   Other
    precision:     2
    statistic:     Individual Obs
    units:         degK
    var_desc:      Air temperature
Note that we get Xarray's lazy backend arrays by default, and that dimension coordinate variables lat, lon, time were read. At this point this looks identical to what we get with a standard xr.open_dataset(store, engine="zarr") command.
Now load a small subset
type(ds["air"].isel(time=0, lat=10).load().data)
cupy._core.core.ndarray
Success! 🎉 😱 🤯 🥳
Xarray integrates decently well with CuPy arrays so you should be able to test out existing analysis pipelines pretty easily.
Cool demo
See above! 😆 We don't have a more extensive analysis demo yet but are looking to develop one very soon! The limiting step here is access to capable hardware.
Reach out on the Pangeo discourse forum or over at cupy-xarray if you have ideas. We would love to hear from you.
Summary
We demonstrate integrating the kvikIO library using Xarray's new backend entrypoints. With everything set up, simply adding engine="kvikio" enables direct-to-GPU reads from disk or over the network.
Acknowledgments
This experiment was supported by funding from NASA-OSTFL 80NSSC22K0345 "Enhancing analysis of NASA data with the open-source Python Xarray Library".
Appendix I : Step-by-step install instructions
Wei Ji Leong helpfully provided steps to get started on your machine:
# May need to install nvidia-gds first
# https://docs.nvidia.com/cuda/cuda-installation-guide-linux/index.html#ubuntu-installation-common
sudo apt install nvidia-gds

git clone https://github.com/dcherian/cupy-xarray.git
cd cupy-xarray

mamba create --name cupy-xarray python=3.9 cupy=11.0 rapidsai-nightly::kvikio=22.10 jupyterlab=3.4.5 pooch=1.6.0 netcdf4=1.6.0 watermark=2.3.1
mamba activate cupy-xarray
python -m ipykernel install --user --name cupy-xarray

# https://github.com/pydata/xarray/pull/6874
pip install git+https://github.com/dcherian/xarray.git@kvikio
# https://github.com/zarr-developers/zarr-python/pull/934
pip install git+https://github.com/madsbk/zarr-python.git@cupy_support
# https://github.com/xarray-contrib/cupy-xarray/pull/10
git switch kvikio-entrypoint
pip install --editable=.

# Start jupyter lab
jupyter lab --no-browser
# Then open the docs/kvikio.ipynb notebook
Appendix II : making sure GDS is working
Scott Henderson pointed out that running python kvikio/python/benchmarks/single-node-io.py prints nice diagnostic information that lets you check whether GDS is set up. Note that on our system, we have "compatibility mode" enabled. So we don't see the benefits now but this was enough to wire everything up.
----------------------------------
!!!!!!!!!!!!!!!!!!!!!!!!!!!!!!!!!!
   WARNING - KvikIO compat mode
      libcufile.so not used
!!!!!!!!!!!!!!!!!!!!!!!!!!!!!!!!!!
GPU               | Quadro GP100 (dev #0)
GPU Memory Total  | 16.00 GiB
BAR1 Memory Total | 256.00 MiB
GDS driver        | N/A (Compatibility Mode)
GDS config.json   | /etc/cufile.json